The goal of LIGERLabs is to provide tools, lectures, in-class exercises, and programming assignments to support instructors wishing to introduce Reverse Engineering and Anti-Reverse Engineering topics into their security courses. We particularly emphasize the interplay between Reverse Engineering and Anti-Reverse Engineering. Development in these two fields has always gone hand-in-hand: as more powerful program analysis techniques were developed, so were new software protection techniques to counter them.
In order to be prepared for what appears to be a forever ongoing cat-and-mouse game, students need to understand how one side drives the other, and they need to learn how to spot weaknesses in novel techniques as they appear and predict how the opposing side will react.
Our course material will prepare students to dissect and understand an unknown piece of potentially malicious low-level code. Furthermore, they will learn how to protect software against such attacks, something that is becoming increasingly important in areas like mobile games, IoT, critical infrastructure, etc. Exposing students to Reverse Engineering techniques will give them a clearer mental model of machine code and a strong foundation in low-level programming. Our educational modules will gradually increase students' familiarity with low-level issues, working towards the ability to manipulate highly obfuscated machine code.
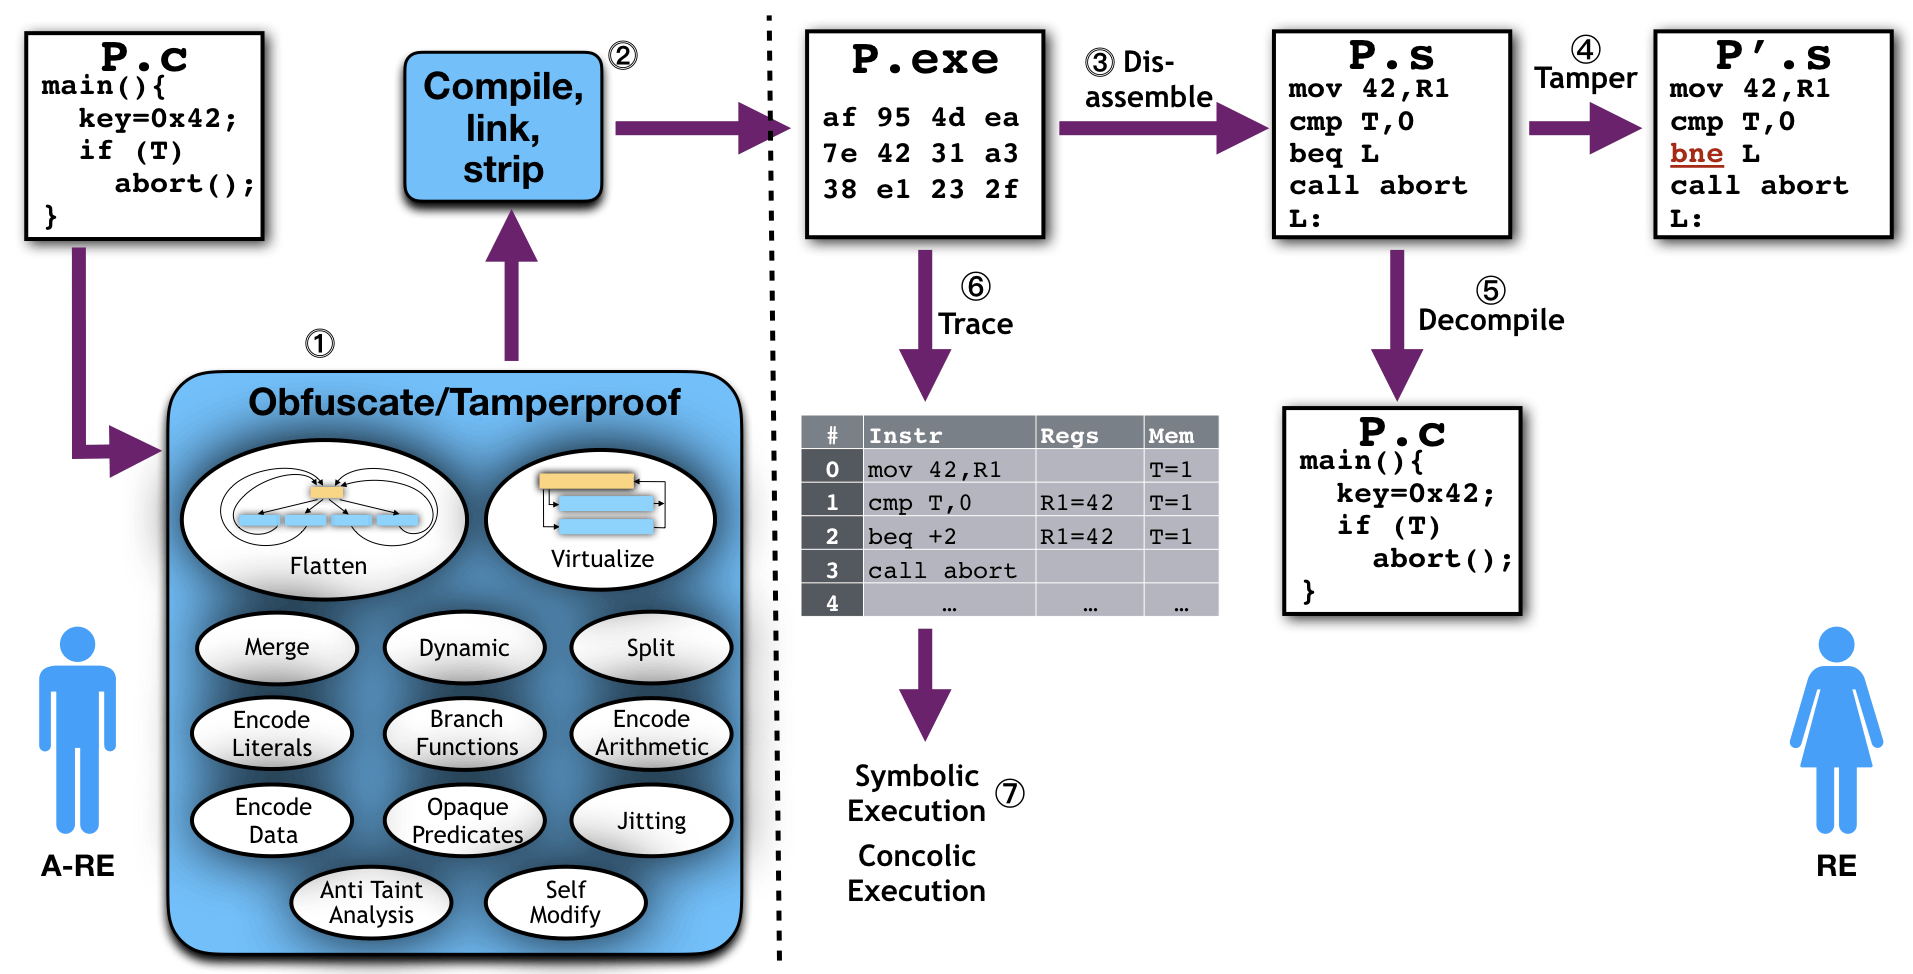
Here is a typical scenario in which an anti-reverse engineer writes their program in a language like C, including asset(s) that need to be protected:
In this case, the assets are a security check (T) and an embedded piece of confidential data (key), both in the program P.c. The anti-reverse engineer uses a software protection tool (1) to obfuscate and tamper-proof the program to protect these assets, then compiles and statically links the program, and finally strips it of symbols (2). The resulting binary is then distributed to users (who can also be adversaries). A reverse engineer uses tools such as disassemblers (3), decompilers (5), debuggers, execution tracers (6), and symbolic execution engines (7), to analyze and possibly modify (4) the binary, in order to achieve their goals.
The main topics for the LigerLabs lectures are Reverse Engineering and Software Protection. They complement each other nicely since Software Protection techniques make Reverse Engineering tasks more difficult. However, to appreciate these topics and to be able to solve the exercises LigerLabs generates, students need a rudimentary background in low-level programming (assembly code, machine code, etc) and compiler-type analyses.
Below is what a typical schedule looks like for the reverse engineering and software protection class I teach. There are two lectures per week, each 75 minutes long. Students are given 12 take-home assignments, and are given a week to complete each. The assignments are not public but if you're an instructor teaching a relevant class, email me and I will send them to you.
#          Date          Lecture       Assignment handed out and topics covered
---------------------------------------------------------------------------------
1)  Thursday January  16 intro-1
2)  Tuesday  January  21 X86-1         [Assignment 1, X86-1 and X86-2]
3)  Thursday January  23 X86-2
4)  Tuesday  January  28 cfg-1,misc-1  [Assignment 2, cfg-1 and ghidra-1]
5)  Thursday January  30 ghidra-1
6)  Tuesday  February  4 ghidra-2      [Assignment 3, ghidra-2 and x86-3]
7)  Thursday February  6 X86-3
8)  Tuesday  February 11 ghidra-3      [Assignment 4, ghidra-3 and X86-4]
9)  Thursday February 13 X86-4
10) Tuesday  February 18 model-1       [Assignment 5, models-1, flatten-1, and softprot-1]
11) Thursday February 20 softprot-1
12) Tuesday  February 25 flatten-1
13) Thursday February 27 ghidra-4
14) Tuesday  March     4 REVIEW
15) Thursday March     6 MIDTERM
    Tuesday  March    11 SPRING BREAK
    Thursday March    13 SPRING BREAK
16) Tuesday  March    18 file-1        [Assignment 6, ghidra-4]
17) Thursday March    20 gdb-1
18) Tuesday  March    25 ast-1         [Assignment 7, gdb-1 and ast-1]
19) Thursday March    27 arith-1
20) Tuesday  March     1 opaque-1      [Assignment 8, arith-1 and opaque-1]
21) Thursday April     3 disass-1
22) Tuesday  April     8 virt-1        [Assignment 9, disass-1 and virt-1]
23) Thursday April    10 trace-1
24) Tuesday  April    15 checksum-1    [Assignment 10, trace-1]
25) Thursday April    17 virt-2
27) Tuesday  April    22 symex-1       [Assignment 11, symex-1 and symex-2]
27) Thursday April    24 symex-2
28) Tuesday  April    29 re-1          [Assignment 12, re-1 and data-1]
29) Thursday May       1 data-1
30) Tuesday  May       6 REVIEW
We primarily use Tigress to generate obfuscated and tamper-proofed programs for students to attack. Here is an example Tigress script which takes the input program int main(){int x++;} and obfuscates it using two transformations (Mixed Boolean Arithmetic and Virtualization) resulting in a program that students can attempt to de-obfuscate, tamper with, or extract an asset from.
tigress \
   --Seed=42 \
   --Environment=x86_64:Linux:Gcc:4.6 \
   --Transform=EncodeArithmetic \
      --Functions=main \
   --Transform=Virtualize \
      --Functions=main \
      --VirtualizeDispatch=direct \
      --VirtualizeSuperOpsRatio=2.0 \
     --VirtualizeMaxMergeLength=5 \
       in.c --out=out.c
union node {int _int ;};
int main ( ) {
char vars [32]; union node stack [32]; union node *sp; void ** pc;
void * bytecode [1][15] = {{
&& local_load_const_xor , ( void *)24 UL , ( void *)1UL ,
&& local_load_const_or_const , ( void *)24 UL , ( void *)1UL , ( void *)1UL ,
&& shiftl_minus_local_store_const , ( void *)24 UL , ( void *)0UL ,
&& local_store , ( void *)28 UL , && local_load , ( void *)28 UL , && return_int }};
sp= stack ; pc= bytecode ; goto *(* pc );
local_store : pc ++;
*(( int *)(( void *)( vars +*(( int *) pc ))))=( sp +0)- > _int ; sp --;
pc ++; goto *(* pc );
local_load_const_or_const : pc ++;
(sp +1) -> _int =*(( int *)(( void *)( vars +*(( int *) pc ))))|*(( int *)( pc +1));
(sp +2) -> _int =*(( int *)( pc +2)); sp +=2; pc +=3; goto *(* pc );
local_load : pc ++;
(sp +1) -> _int =*(( int *)(( void *)( vars +*(( int *) pc ))));
sp ++; pc ++; goto *(* pc );
return_int : pc ++; return (( sp +0) -> _int ); goto *(* pc );
local_load_const_xor : c ++;
(sp +1) -> _int =*(( int *)(( void *)( vars +*(( int *) pc ))))^*(( int *)( pc +1));
sp ++; pc +=2; goto *(* pc );
shiftl_minus_local_store_const : pc ++;
(sp +-2)-> _int =(( sp +-1)-> _int <<( sp +0)- > _int )-( sp +-2)-> _int ;
*(( int *)(( void *)( vars +*(( int *) pc ))))=( sp +-2)-> _int ;
(sp +-2)-> _int =*(( int *)( pc +1)); sp += -2; pc +=2; goto *(* pc );
}
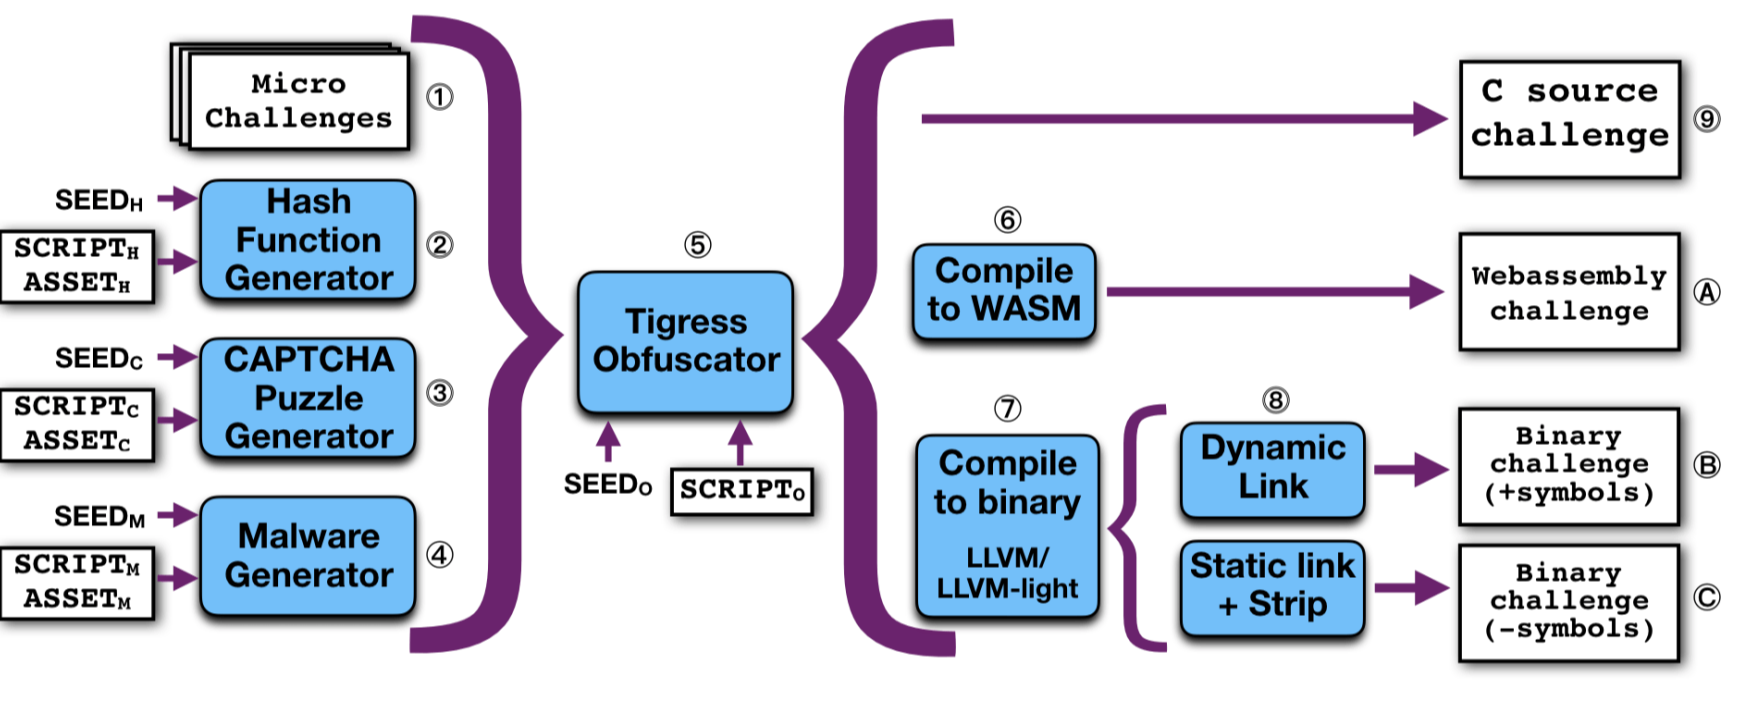
As shown in Figure below, our system can to generate four types of applications for students to attack: micro challenges, hash functions, CAPTCHAs, and malware. The four types allow us to provide different degrees of complexity and realism to our challenges: The micro challenges help students get started learning about new techniques, the hash functions can be made arbitrarily complex and unique to each student, the CAPTCHAs represent good-ware use of Anti Reverse-Engineering, and the malware challenges represent malicious use of Anti Reverse-Engineering. Conceptually, the challenge generators take 3 inputs: a seed which is used to initialize a random number generator, a script which describes how the challenge should be generated, and an asset which is the aspect of the challenge that the student is supposed to extract or modify. For example, the seed could be generated from a hash of each student's email address, and would drive every internal decision by the generator, thereby ensuring that each student gets a unique challenge to attack.
Micro Challenges are helpful to students when they start learning about a new Reverse Engineering or Anti Reverse Engineering technique. A big part of RE is finding the location of the code that needs to be extracted or modified. If, when learning about a new attack, students start by working on a tiny problem, they
can bypass the location part of the process and can go straight to executing the attack. Once they
have mastered attacks on micro challenges, students can move on to analyzing real programs where
the asset is more cleverly hidden. A typical micro challenge will only be a few lines long.
Random Hash Functions Challenges are useful when students have reached a higher level of expertise.
These functions have a simple interface (they take a list of integers as input and return a list of
integers as output) which makes them easy for students to manipulate. They can also be made
arbitrarily complex, with arbitrarily many functions, nested control
ow, state size, etc. Hidden
within the function can be various types of assets that the students can be asked to modify or
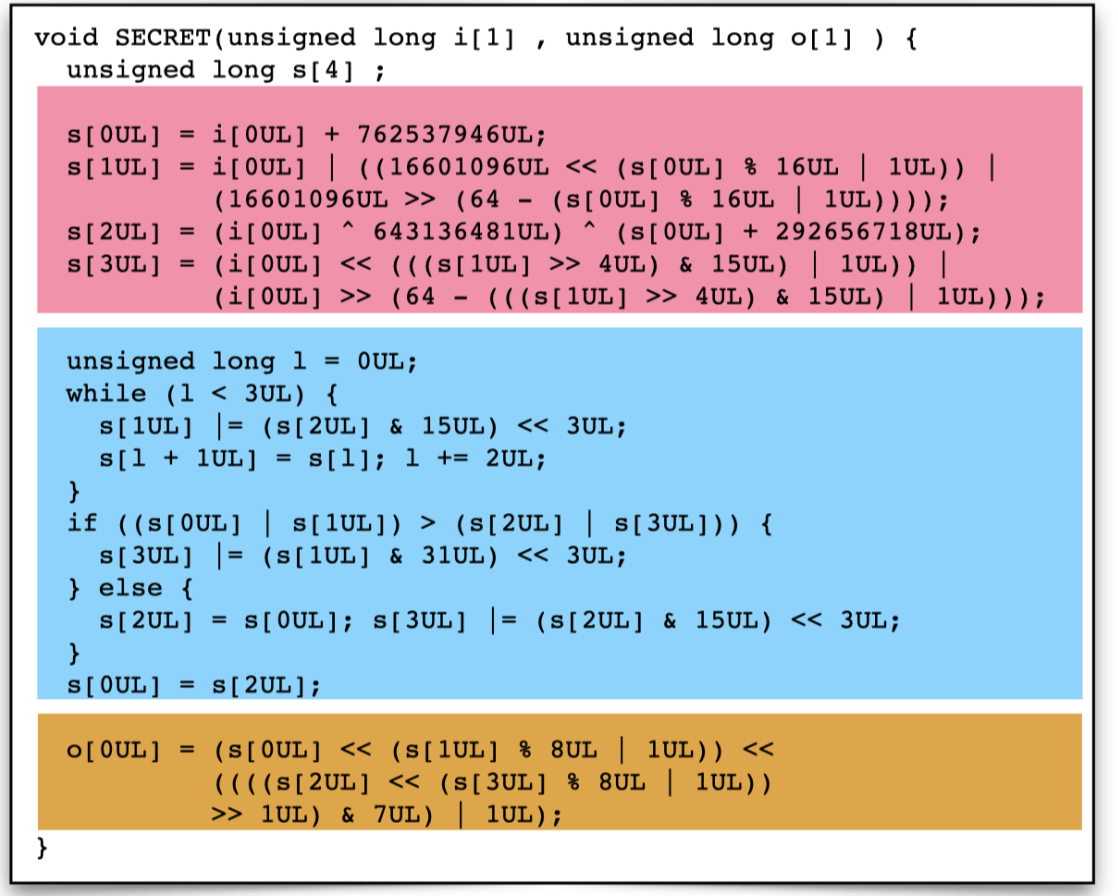
extract, such as a security check, or, indeed, the source code itself. Here is an example
of a program generated by Tigress hash function generator. The generated function has 3 parts, a state-expansion part (pink), followed by a mixing part (blue, with
complex control flow), and a state-compression part (yellow).
Malware Challenges differ from the other types of goodware challenges, obviously, by being malicious in nature. Although they have many of the same attributes as real malware, they have been constructed in such a way that they are unlikely to cause real harm. Currently, we are able to generate neutered ransomware challenges.
Protecting Challenges. Tigress has
three sources of diversity: the seed which randomizes every internal decision, the sequence of transformations
applied to the code (for example, EncodeArithmetic followed by Virtualize), and arguments
to individual transformations (VirtualizeDispatch, for example, has 9 different values). Thus,
every student in a class can easily be given a program that has been uniquely obfuscated for them,
reducing the risk of academic integrity violations.
Translating Challenges. As you see from the figure above, all our obfuscated challenges
can be given to the students in a variety of formats: source code, bytecode, dynamically linked
binary code, and, finally, as statically linked, stripped, binary code. Each representation has less
information available to the Reverse Engineer than the previous one.
Students benefit from starting out examining and reverse engineer obfuscated source code before moving
on to working on binary code. Having a mental model of the structure of different types of code
protections helps students identify such codes when they see them in the wild in a binary executable:
a switch statement within an infinite loop is likely to indicate flattening, indirect jumps through
a table within a loop is more likely to indicate virtualized code with a threading dispatch,
and so on. Once they have mastered analyzing protected source code they can move on to analyze
the same protection on program representations that contain less information.
Furthermore, when students are learning about powerful program analyses such as symbolic
execution, it will be easier for them to interpret the output of source-level tools, such as KLEE,
than of tools that operate on binaries. Bytecode, such as WebAssembly or Java bytecode, is the
next easiest for the students to work with, since it is typed, has a small and regular instruction
set, and can easily be disassembled and decompiled. Once the students are comfortable at this level, they can move on to dynamically linked binary code (which retains symbols),
Our generated challenge can be auto-graded. This is helpful for instructors who don't have much familiarity with Reverse Engineering and/or Anti-Reverse Engineering. Since every challenge is unique, every solution may be unique, and
students should be treated equally and fairly.
To grade, we need to solve two problems: we have tp check that submitted solutions
are correct (a deobfuscated program is semantically identical to the original (unobfuscated)
program) and precise (the deobfuscated program is similar to the original (unobfuscated) program,
i.e. the obfuscation has been removed). To measure correctness, we use symbolic analysis and coverage analysis over
the original program to generate a set of test cases that cover as many execution paths as possible.
As a rough measure of precision, we compute traces of the obfuscated and
deobfuscated programs, lift to a higher level intermediate code, group the instructions by class
(arithmetic, memory, etc.) and compare the number of instructions. We also measure with CFG similarity metrics.
We provide a set of videos that students are expected to watch prior to class. There is one video per lecture, each one being approximately 20 minutes long. We provide a few simple quiz questions for each lecture/video that can be used prior to class or the first few minutes of class to ensure that students have watched the videos. The slides for the videos are available in a pdf format.
We provide a set of in-class exercises. The idea is that students have watched the introductory videos before class, we lecture and answer questions for the first 10 minutes of class, and then during the remainder of the class students work in small groups solving the exercises.
We provide a virtual machine in which students will perform their assignments an in-class exercises. It has all the necessary software for the course preinstalled.
Before using the automatic assignment generation and grading tools, you will have to decrypt the instructor-only parts of the package using the key obtained from us. After obtaining the key, startup and login to the virtual machine. Follow the same instructions as given to the students. Then, navigate to the "AutoAssignRE" subdirectory of your home directory and execute the command to decrypt and extract the instructor-specific files:
> cd AutoAssignRE
> 7z x instructor_files.7z
You will be prompted for the password, which is the key you received from us.
After the files have been extracted, there will be three additional command line programs: generate-assignment.py, auto-grade.py, and summarize_scores.py. A fourth program package-submission.py is for use by students and is documented in the student section.
The program generate-assignment.py is used to generate the assignment files and produces a unique set of files for each student. It contains a large number of parameters, the documentation for which may be referred to by running the program with the `-h` option. There are example input files for the program in the "example" subdirectory, and an example command-line run of the program is as follows:
 ./generate-assignment.py \
  --seed 2 \
  --assignment_id assignment1 \
  --course_id 466 \
  --student_id_type Alt_ID \
  --students_filename example/students.csv \
  --assignment_instructions_filename example/instructions.txt \
  --submission_requirements_filename example/submission_requirements.json \
  --output_dirname example/output/student \
  --metadata_out_filename example/output/instructor/metadata_out.json \
  --environment_string x86_64:Linux:Gcc:5 \
  --generate_script_filename example/generate.sh \
  --obfuscate_script_filename example/obfuscate.sh
The python modules, "AutoAssignRe_common.py" and "AutoAssignRe_instructor.py", must be in your PYTHONPATH (or currentdirectory), which is already correctly set in the VM. Tigress must already be setup in your PATH and the TIGRESS_HOME environment variable exported, both of which are already setup correctly for you in the VM. If you use these programs outside of the VM, you will have to manually ensure that those things are properly set up.
The option "--student_id_type" selects the field(s) of the student list (CSV file) to use to identify students. For example, you might want to use the students' email addresses, or you might want to use an identifier that preserves the students' privacy better. Such an *alternative identifier* may be provided as the last column of the student list (CSV file) and specified as "Alt_ID" with the "--student_id_type" parameter. An example student list is found in the "example" folder and named "students.csv". It contains three mandatory columns and one optional column: Last Name, First Name, Email Address, Alternative ID.
For each student in the student list, the generate-assignment.py program will produce an output subdirectory of the directory specified with the "--output-dirname" parameter. The subdirectory will be given the same name as that student's identifier, and inside of the subdirectory will the the files for the assignment for that student: a unique metadata file, a unique C source file to analyze or binary file to reverse engineer, and an instructions document, the same for every student, containing the assignment instructions. The instructions document is copied from the file specified by the "--assignment_instructions" parameter.
A submission requirements file enables you to specify whether the student is to provide a deobfuscated source file or hacked binary or is to provide an asset extracted from the file the reverse engineered, or both. An example of such a file is found in example/submission_requirements.json`. If an asset is to be provided by the student, that can be specified in the "prompted_inputs" section.
A corresponding entry should be made in the answer key file, an example of which is found in `example/grading_parameters.json`. The automatic grading program will read the answer key and compare it to the answer that the student submitted as the response to the prompt. If it is an exact match (except for leading and trailing whitespace), the student will get a number of points indicated by the "weight" field for that answer in the prompted inputs section of the grading parameters file.
In general, you will select a generate script and an obfuscate script from the list of typical Tigress challenges provided in the VM, but you may also write your own scripts, which can customize the Tigress command and also add any additional pre- or post- generation steps you deem appropriate or necessary. Examples of generation and obfuscation scripts are found in the "example" directory. In this case they are BASH shell scripts, but they may be any kind of program that can be executed by a Linux shell. A compile script should also be provided if the output is supposed to be a binary file, and the provided script could be a default script provided by us in the VM or a custom script written by you.
Finally, an instructor-specific metadata file is produced that can be used to reproduce the same output in a subsequent run of the generate_assignment.py program, and is also to be provided to the auto-grade.py program so that it can re-generate the output in order to compare the results of the student's deobfuscated C code or hacked binaries with the original programs before obfuscation. The metadata file should *not* be provided to the students. Optionally, the original programs before obfuscation may be saved using the "--save_unobfuscated_orig_dirname" option; otherwise, they are generated in a temporary directory.
After using obtaining the output of the generate_assignment.py program, you may zip up the entire directory, for example, the "student" directory found under "example/output", and provided it to the students. The students can find their files under the subdirectory name for their student identifier.
Automatic grading is achieved with the program auto-grade.py. The program has three required arguments and some additional optional arguments that are documented through the program's help function. The help may be invoked with the `-h` option to the program.
The first required argument is the instructor-specific metadata file produced as output from the generate_assignment.py program. It identified the assignment in machine-readable form and allows the program to re-generate the necessary files.
The second required argument is the grading parameters file, which was mentioned above. If contains the answer key and other specifics needed to correctly grade the assignment. The grading parameters file may contain a reference to a location of test cases that will be automatically generated by symbolic execution or cached test cases generated during a previous run of the auto-grade.py program.
The third required argument is the path to a directory containing all of the packaged submissions provided by the students. Each submission is a zip file.
The output is a printout of the CSV string containing the scores in each category that can be automatically assessed, one line per student submission. (There could be multiple lines per student if some students have made multiple submissions.) The fields of the CSV are:
The "packaged time" is a time stamp provided by the package_submission.py file, but it might not necessarily reflect the time when the assignment was submitted by the student. The "submission time" field can be combined into the CSV string if it is provided by you in a separate CSV file using the --submitted_timestamps_csv_filename option. You would have to obtain such timestamps in some unspecified way, such as by writing a script to extract them from your email, ftp, or cloud software through which the students make their submissions.
The "summary score" is a field that combines all of the other scores into a single value that could be used as a grade for the assignment.
A separate program summarize_grades.py produces that value from the output of the auto_grade.py program and outputs a new CSV string with that column filled. The intention is that you would provided the appropriate formula by editing the summary_grade Python function inside of the AutoAssignRe_instructor.py Python module. The example function uses the formula: summary_score = 0.5 * (number correct /number of tests) + 0.5 * performance_score.
The output of the auto_grade.py function can be piped into the summarize_grade.py function.
Here is an example:
 ./auto-grade.py \
  "example/output/instructor/metadata_out.json" \
  "example/grading_parameters.json" \
  "example/output/" \
  --compile_script_filename="example/compile.sh" \
  --tigress_environment="" \
| ./summarize_scores.py
This example assumes that you have put the students' submissions (zip files) into the "example/output" directory.
NOTE: The Tigress environment string is required as an input argument to the compile script, but some compile scripts might not use it, in which case it would be okay for it to be empty. For example, it might be expected to be used if cross-compilation is needed. The provided example compile script does not make use of it.